Technology

OpenCV – understanding the IplImage data type

In the last post we looked at loading and displaying an image. Something very simple and basic. Today we’ll explore the IplImage type we used earlier. IplImage is really a matrix with a header. In fact the type cvMat is interchangeable with IplImage. Actually that’s partially true. imageData of IplImage is used to create a cvMat object. things like nChannels, step,height, width, depth are part of IplImage header.

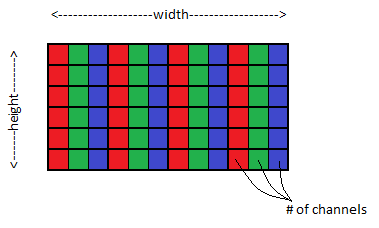
opencv_iplimage

The diagram above shows how an image is stored in a matrix. We are using a colour image so number of channels is 3 for RGB. The height and width are in pixels so my Google+ logo is 320px x 450px. So we now that for each of the squares above we will correspond to one channel of one pixel. cvMat is an array in C/C++. so to access the first channel of top left (first) pixel, we will reference it using data[0] and the last channel of last pixel is data[n] . So the image is stored from top left to bottom right. Row 1, row 2, row 3, etc. This means we can access the value of each pixel and each channel.

Let’s see an example. Let’s try to invert the Google+ logo. To invert we have to simply subtract the value from its maximum. For this we need to first find out what the depth is. Depth is the number of bits per channel. Typically it is 8bits so a total of 2^8 = 256 values ranging from 0 to 255.  Our image has a depth of 8 (bits). Therefore to invert we have to subtract the values from 255 for each channel and each pixel.

The pixels can be traversed like a standard grid Row i, Column j. Then to get a channel we add k. So it will be something like:
i*step + j*channels + k
We have to remember that each pixel is made up of 3 elements in a matrix that is why we multiple j by the number of channels. So i*step + j*channels points to the first channel of a pixel. k simply chooses the channel within the pixel. The imageData sometimes pads the rows so the step maybe different to width*channels. For that reason we use step instead of width. We wrap this in 3 for loops one each for rows, height and channels.

Let’s see this in action:

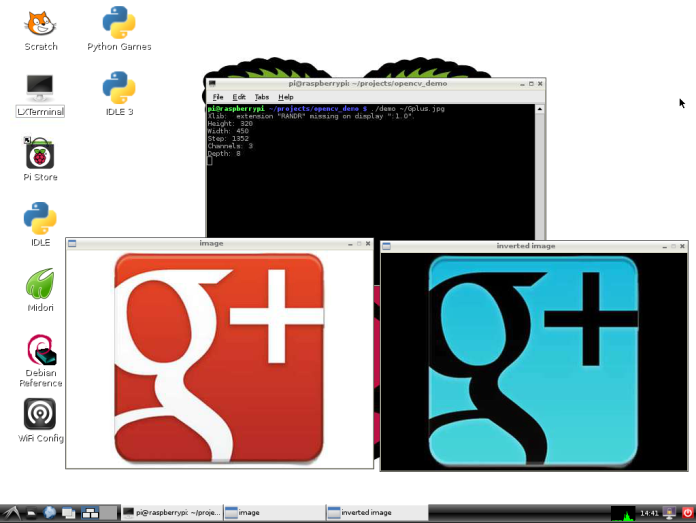
opencv_invertedimage

On the left is the original image and on the right is the inverted image. White (255,255,255) is converted to Black (0,0,0) and red (255,0,0) is converted to cyan (0,255,255); of course there is a gradient and the values are just examples.

Once again here is the code and binary.

Next up is working with videos.
Standard
Technology

Raspberry Pi + OpenCV demo

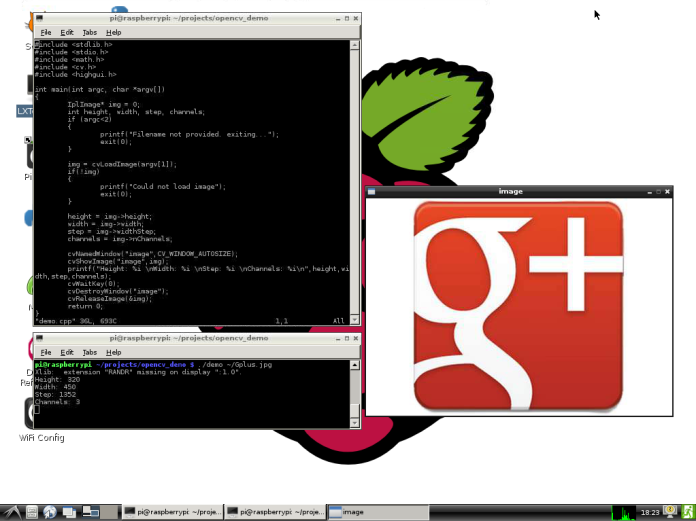
Here’s a demo application which opens an image and prints out its height, width, steps and number of channels.


opencvdemo

It is fairly simple to follow. cvLoadImage() is used to open an image. This function returns a pointer (denoted by asterisk) to the location of memory containing the image. The image is of type IplImage. Using this, the height, width and other properties can be extracted. The image itself can be accessed by img->imageData however this returns uchar* . To display an image first a window needs to be created using cvNamedWindow(). cvShowImage() is used to display the image in the window with the specified name. The printf() statement is a standard C++ statement and displays the data.

cvWaitKey(0) is used to listen for a key press. Zero is used to wait indefinitely. This function returns an integer corresponding to the pressed key, however we are not interested in this for the demo. Once it is time to exit, we need to clean up the memory used by our program. First is the destroy the window using cvDestroyWindow(). cvDestroyAllWindows() can also be used if you want to close multiple windows. Lastly, we need to release the memory which holds our image using cvReleaseImage().

The OpenCV reference can be found here: http://docs.opencv.org/index.html

I have made the code and binary for the demo available at: Demo Files

In the next post I’ll be exploring the IplImage structure and how to work with individual pixels.

Please note the functions mentioned above don’t show any input parameters, this is done to keep the text readable. Please look up the exact syntax on the reference link above.

Update:

The code here is actually C code not C++ as previously mentioned. I thought I’d update this to avoid confusion. If C++ is to be used, the libraries in the include statements would be highgui.hpp etc and the functions will be different like cvShowImage() is replaced with cv::imshow(). The source code file has extension cpp but it doesn’t really matter.

Standard
featured, Technology

Raspberry Pi Security Monitor Project – Take 2

So this is my second attempt at working on a security system project with my Raspberry Pi.

Unfortunately, my first attempt was abandoned due to holidays and I never picked it back up after coming back. So here goes attempt 2!

As before I’m using a Raspberry Pi Model B 256MB RAM (old model) with Raspbian OS. I’m still going to use OpenCV but this time updating the version to 2.4.3 . I chose to build OpenCV from source rather than getting the pre-built packages from aptitude.

Compiling the library was simple but long process. you can follow either the guide on OpenCV wiki or from MitchTech blog. The Mitchtech blog has a cleaner easier to follow instructions as it deals only with Raspberry Pi (Unix install).

The process to compile took several hours so I suggest you let it run overnight or go watch a movie in the mean time.

After it successfully compiled, running “make install” didn’t take long. then you are pretty much ready to go.

Initially, I looked at using Python for working with OpenCV but soon I found limitations as the python wrapper hasn’t been updated since OpenCV 2.1 (I believe). I have read elsewhere on the internet that an updated wrapper is coming soon. So I’m going to use C++. This is exciting because I get to use pointers. Nowadays with C# and Java and other languages developers don’t use pointers and don’t perform memory management themselves. This is good opportunity to further my knowledge of pointers and get familiar (again) with C++.

I have installed this last night and today I’ll be playing around to get basic image manipulation working. I need a refresher as it has been 2 years since I last used OpenCV and C++!

Will be posting an update soon!

Standard